4 Remote Repositories
Branching is great, but what use is it if we’re still stuck in a command line tool on your own computer? How can you share your changes with your boss, especially if your boss doesn’t know Git? How can your friend make a branch in your repository - do you need to share a keyboard?
Remote repositories are the answer!
Git does allow you to connect directly to a co-worker’s computer to share changes to Git repositories - it’s actually a key selling point for Git (a distributed version control system). But it’s also one of the hardest ways to use Git - remote repositories are really easy by comparison!
As a general rule of thumb, if you’re a developer working on the Linux Kernel then you should learn how to use distributed Git. For everyone else, just use Github, Bitbucket or Gitlab4.1 Informal Collaboration
When you want to share code amongst a small team, you really just have a few requirements:
- You need to be able to share with specified people, or maybe make it public
- You need to be able to give people permission to make edits (commits)
- The workflow needs to be integrated with your local Git repository
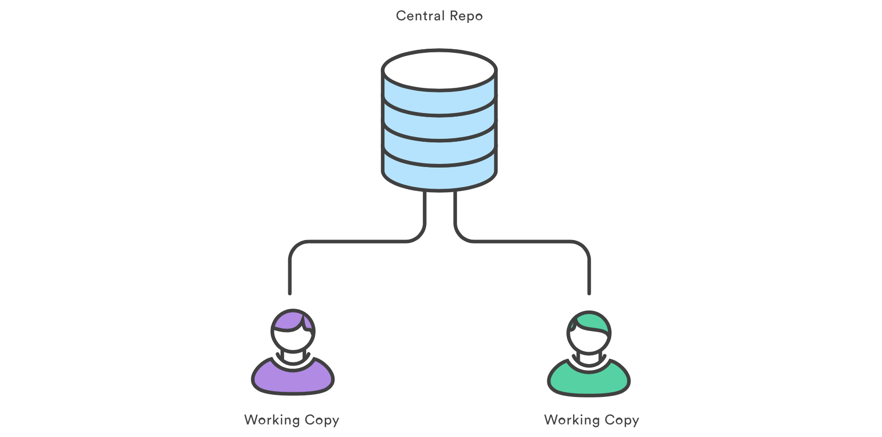
It turns out this is pretty easy to achieve using popular Git hosting services. In general, the idea is that the Git hosting service plays the role of the central repository, and everyone working on the team clones the repository to create their own local working copy. Everyone is then free to work offline using their preferred tools, making commits to their working copy, and when you’re ready to share you can push the changes back to the central repository. When the rest of the team wants to sync their working copy and get a copy of the changes you just made, they just have to pull the changes into their local working repository.
There are two ways to establish this central repository:
- Create a template repository from within the web interface, then clone it on your own computer
- Push your local repository to the central repository
We’ll cover both of these approaches below using Bitbucket as an example, although the process is quite similar for Github and Gitlab.
If you haven’t already, you should create an account with Bitbucket so that you can follow along with these examples. You’ll need it anyway in order to submit your first assignment.
You should sign up with your UTS student email so that you automatically get given an Academic License.4.1.1 Creating a repository on Bitbucket
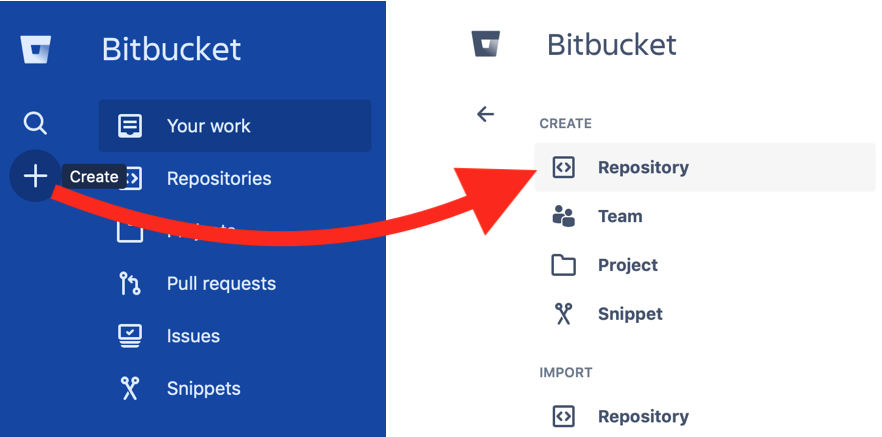
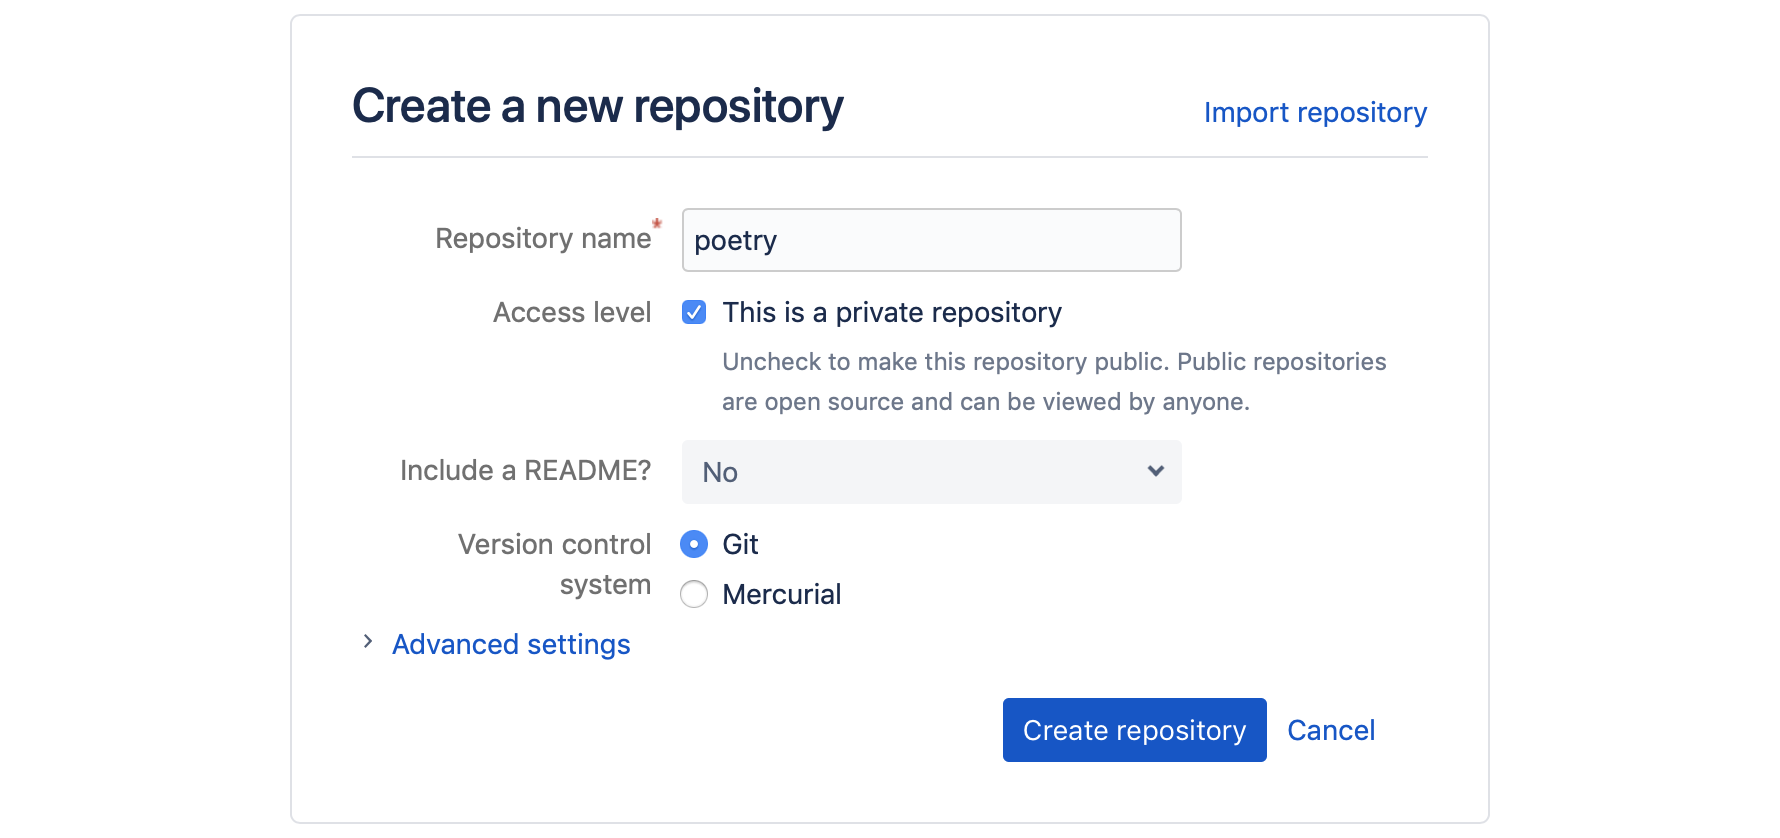
Log in to your Bitbucket account and click the + then Repository to open the Create a new repository dialog.
Give the repository a name (make it easy to type) and select No to the README question. You can leave the repository as private if you like, otherwise uncheck the box to make it open to the public.
4.1.2 Connecting your local repository to the remote
The first thing we need to do is tell our local repository about the new
remote repository, so that it knows how to push and pull. We’ll use the
git remote add command to do this; Bitbucket makes it easy to do this by
providing the command that you need to use. In my case, Bitbucket tells me to
use the following command:
$ git remote add origin git clone https://perrystephensonuts@bitbucket.org/perrystephensonuts/poetry.gitIn your case, the URL at the end will be different - if you follow the instructions in Bitbucket you’ll be fine.
By convention, the remote repository gets given the name origin, which is worth remembering because you’ll see it all over the place. Because we’re using Bitbucket, you can just keep in the back of your mind that when you see origin it really means Bitbucket. The final part of the command above is the address of the remote repository.
Your remote link will look different to mine -
not only will your username be different, but you may (unlikely) have
git@ at the start of the address rather than https://. The default
communications protocol is HTTPS but the alternative SSH protocol is
often considered more secure due to the use of cryptographic key pairs rather
than a username and password. They are still both very secure.
4.1.3 Pushing your repository for the first time
Bitbucket provides the command to do this as well, using the git push
command. Because we’re pushing for the first time, we need to use
-u origin master to tell Git that we want to push the master branch to
the origin repo (Bitbucket), and that we want to establish a link between
the master branch on Bitbucket and the master branch on our local
computer.
$ git push -u origin master
Enumerating objects: 21, done.
Counting objects: 100% (21/21), done.
Delta compression using up to 8 threads
Compressing objects: 100% (16/16), done.
Writing objects: 100% (21/21), 1.94 KiB | 995.00 KiB/s, done.
Total 21 (delta 4), reused 0 (delta 0)
To bitbucket.org:perrystephensonuts/poetry.git
 * [new branch]      master -> master
Branch 'master' set up to track remote branch 'master' from 'origin'.
Git has just done a few things at once for us:
- created a master branch on Bitbucket
- set up an origin/master reference in the local repo, which is linked to the master branch (this isn’t super important to understand)
- pushed all of the commits on the master branch up to Bitbucket
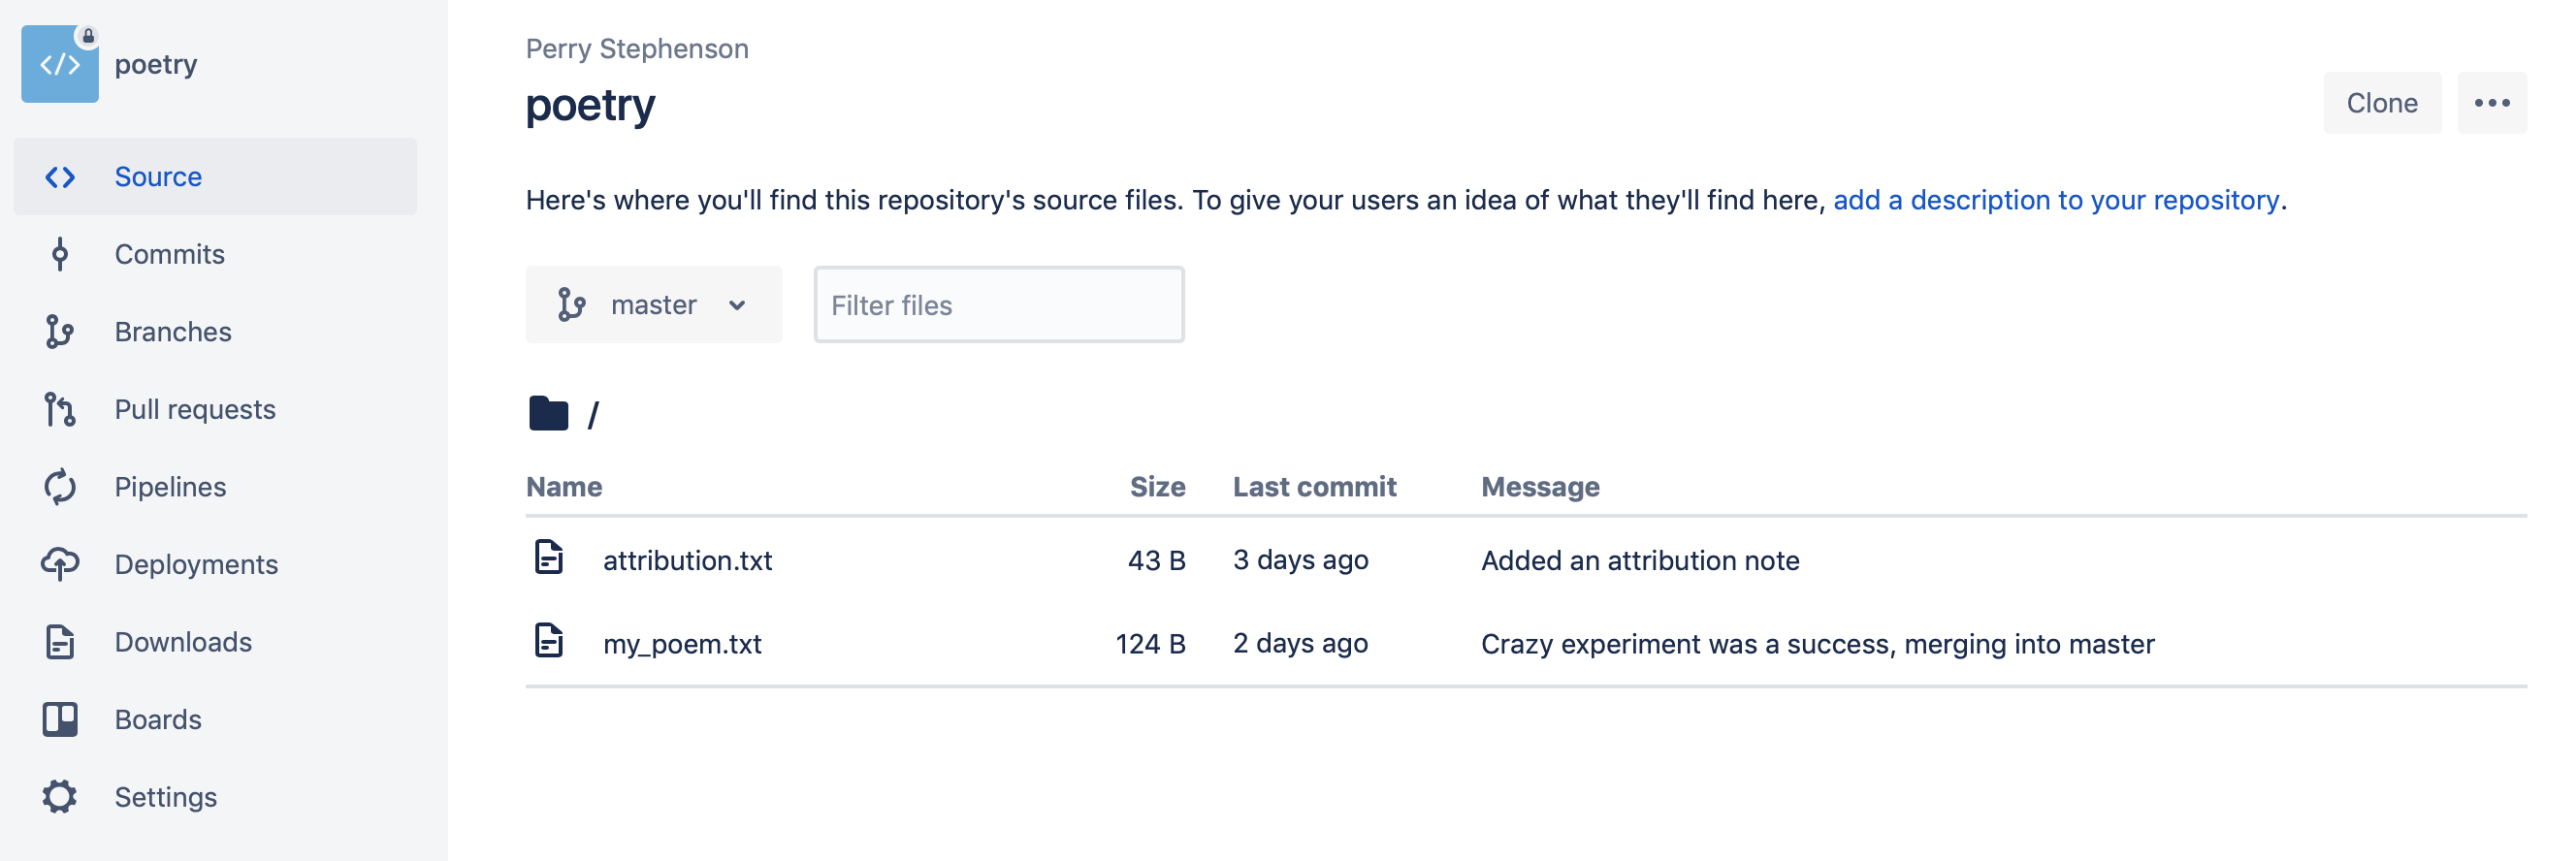
If you go back to your web browser and refresh the Bitbucket page, you should now be able to see the files from your repo:
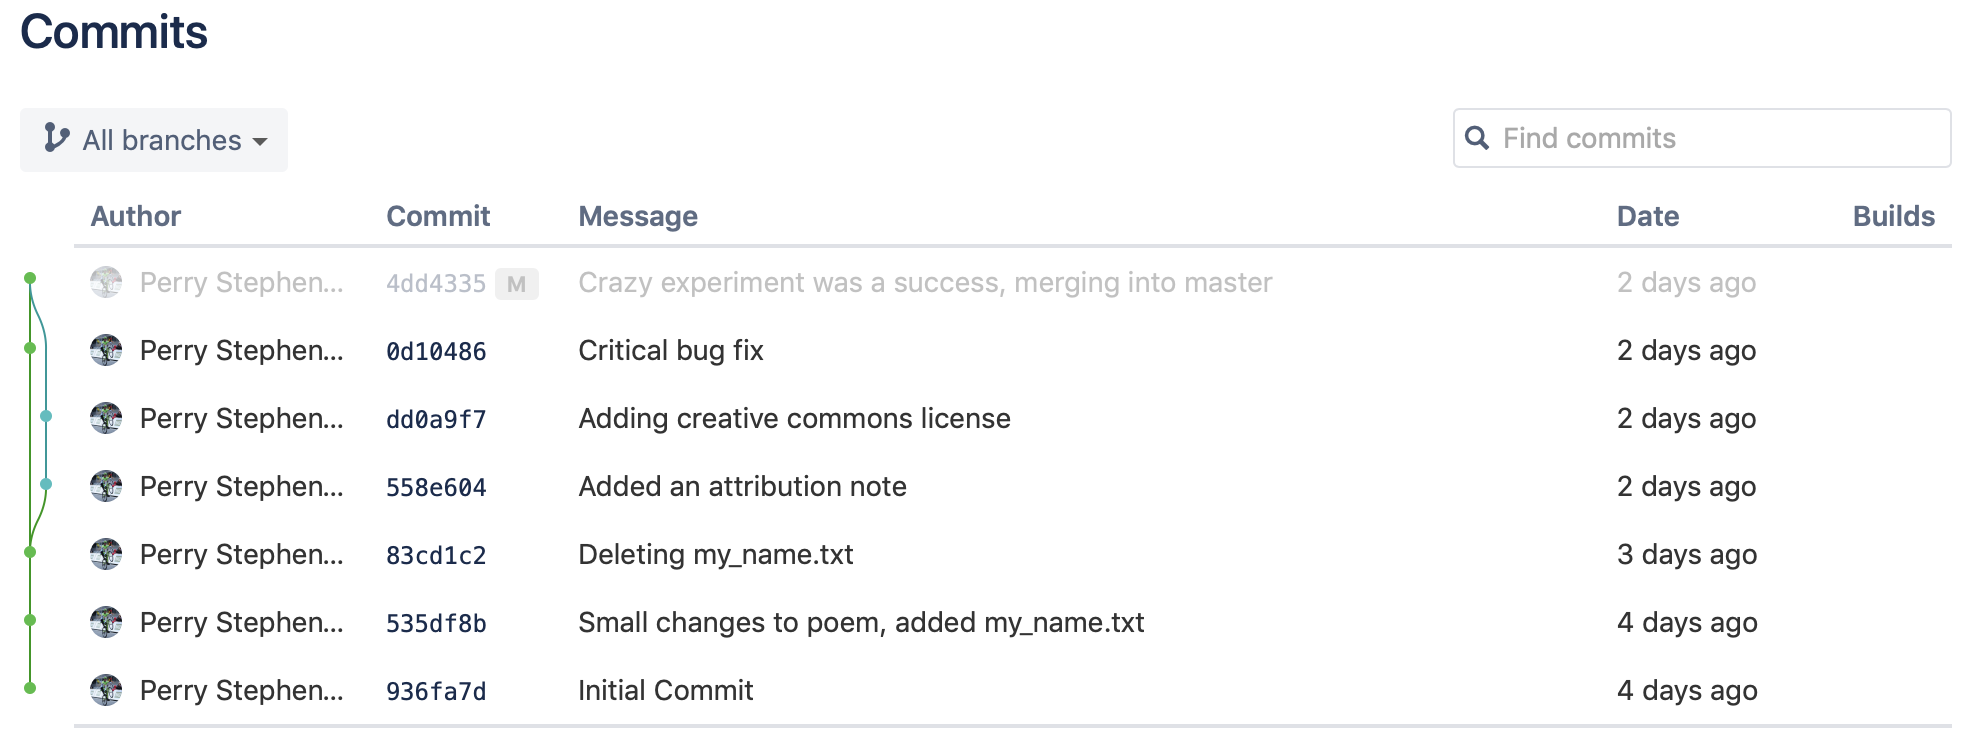
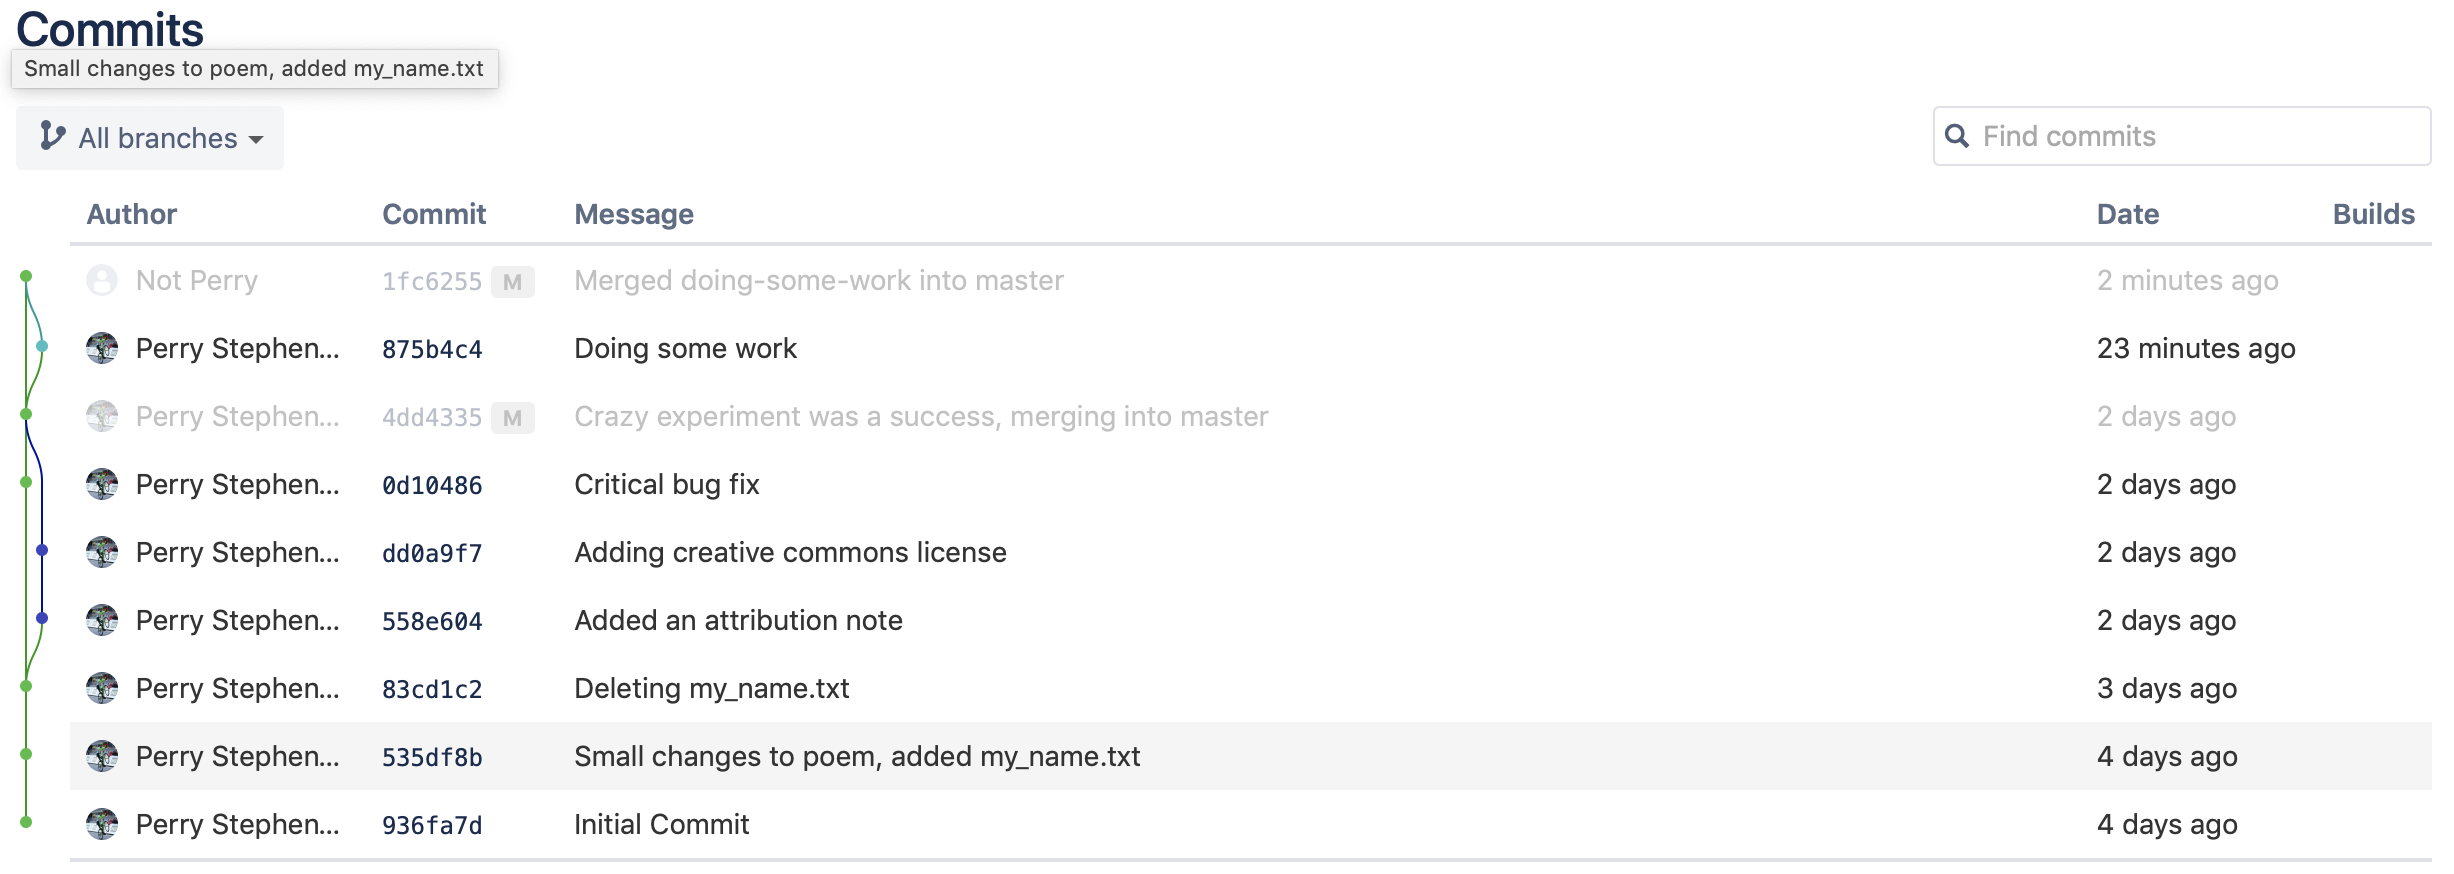
If you click on the Commits tab on the left of screen, you’ll see that all of the commits were uploaded as well - you can even see the branch and merge displayed clearly.
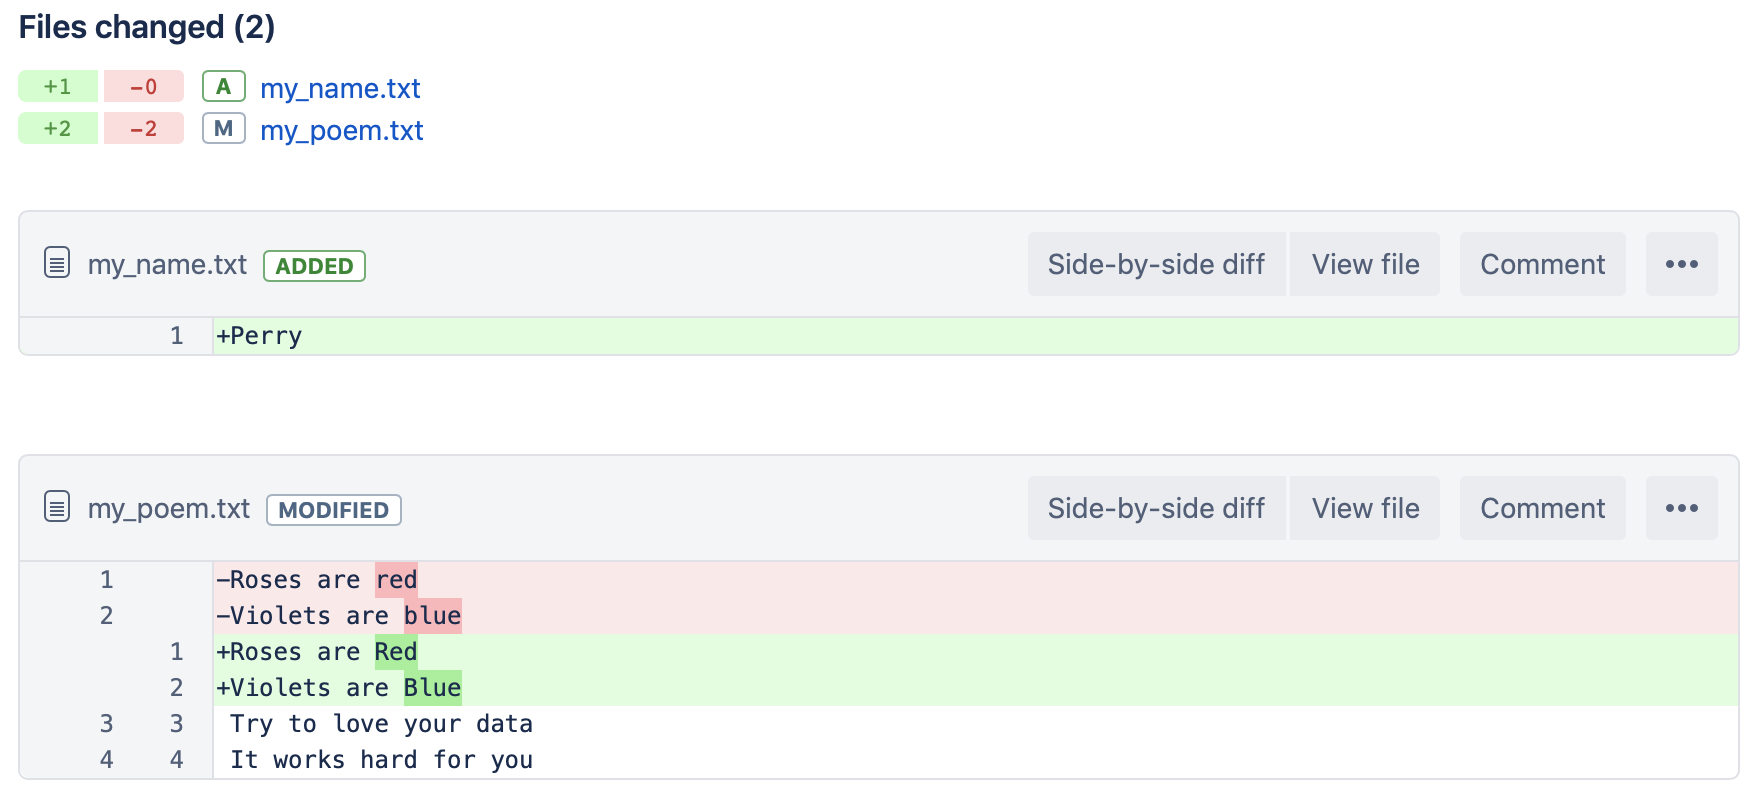
If you click on one of the commit hash links, you can see more detail about the individual commit including a much easier-to-read version of the diff command we covered earlier.
4.1.4 Collaborating with a team
This is all very cool, but there is nothing here that you couldn’t do on your desktop using a tool like Sourcetree. The key feature of tools like Bitbucket is team collaboration, so let’s invite our team!
- Click on Settings
- Click on User and group access
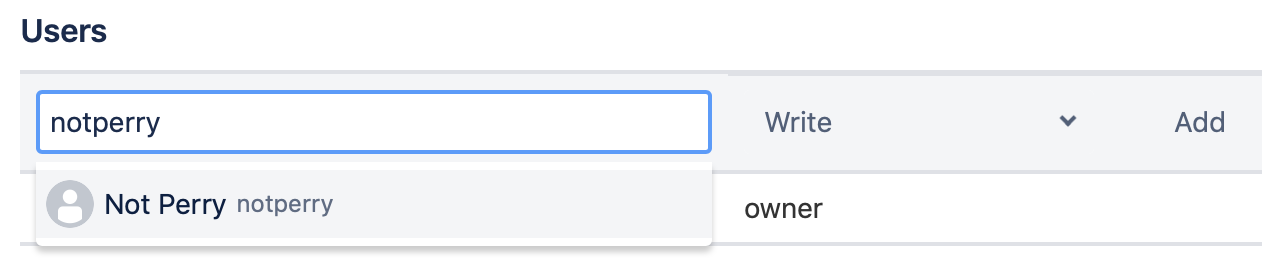
- Type your teammate’s username or email into the search box, and select their account when it pops up
- Set your teammate’s access to either Write or Admin - they won’t be able to make commits if they only have Read access.
4.1.5 Joining an existing repository
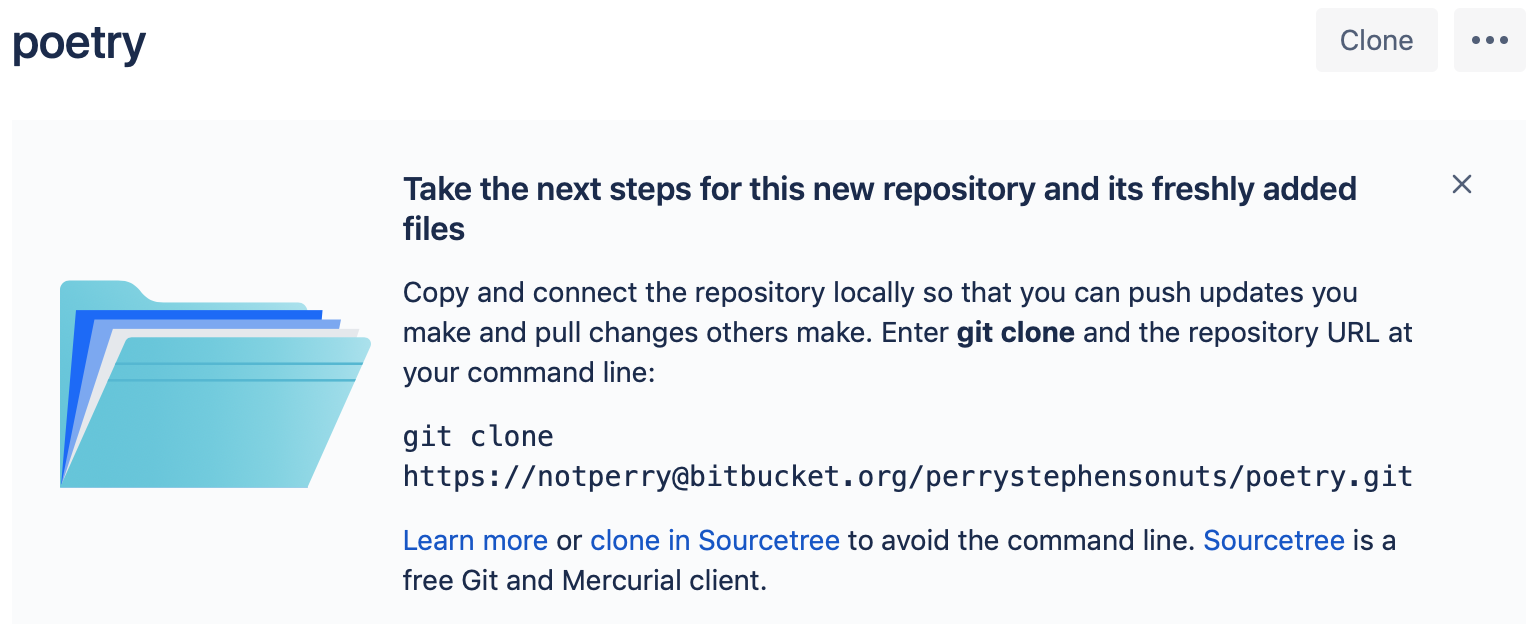
Now let’s look at this from the teammate’s point of view. You’ll get an email from Bitbucket telling you that you’ve been given access to a new repository, and when you log in to Bitbucket you’ll see the repository on your front page.
Click through to the repository and you’ll see a guide for how to clone the repository to your computer (note that the command shown to you will be different to the command shown to me):
Open a terminal and navigate to the location where you want the repository
to appear. Remember that a repository is a directory which means that it
will create a new folder when you clone - i.e. if you navigate to ~/code then
clone the poetry repo, it will create ~/code/poetry for you
automatically.
Let’s run the git clone command that we copied from Bitbucket (above).
$ git clone https://notperry@bitbucket.org/perrystephensonuts/poetry.git
Cloning into 'poetry'...
Password for 'https://notperry@bitbucket.org':
remote: Counting objects: 21, done.
remote: Compressing objects: 100% (16/16), done.
remote: Total 21 (delta 4), reused 0 (delta 0)
Unpacking objects: 100% (21/21), done.
If we look inside the directory that just appeared, we can see all of the files from before:
$ cd poetry
$ ls
attribution.txt my_poem.txt
You may like to use git log to convince yourself that this repo also contains the full history of the master branch, just like the copy on Bitbucket.
With this new working copy, the overall setup looks like this:
4.1.6 Making changes to a shared repository
Now that the repository is shared, it’s going to cause problems if both team members start making commits to the master branch. That’s not to say you can’t make commits to the master branch, just that you’ll be making life a little harder than it needs to be. So let’s make a new branch and do some work.
$ git checkout -b doing-some-work
Switched to a new branch 'doing-some-work'
We’re now on the new branch, so we can make some changes:
new_file.txt
This is a new filemy_poem.txt
Last updated: 2019-02-23

Roses are Red
Violets are Blue
Try to love your data
It works hard for you

License: CC BY-SA 4.0
And now we can stage those changes, ready for commit:
$ git add --all
$ git status
On branch doing-some-work
Changes to be committed:
  (use "git reset HEAD <file>..." to unstage)

    modified:   my_poem.txt
    new file:   new_file.txt
Finally we can commit the changes with a commit message:
$ git commit -m "Doing some work"
[doing-some-work 875b4c4] Doing some work
 2 files changed, 2 insertions(+), 1 deletion(-)
 create mode 100644 new_file.txt
So now we have two branches in the repository:
- master, which is up to date with origin/master
- doing-some-work, which only exists on my computer
So now we need to push this new branch (and all of the commits) back up to the central repository:
$ git push -u origin doing-some-work
Enumerating objects: 6, done.
Counting objects: 100% (6/6), done.
Delta compression using up to 8 threads
Compressing objects: 100% (3/3), done.
Writing objects: 100% (4/4), 384 bytes | 384.00 KiB/s, done.
Total 4 (delta 1), reused 0 (delta 0)
remote:
remote: Create pull request for doing-some-work:
remote:   https://bitbucket.org/perrystephensonuts/poetry/pull-requests/new?source=doing-some-work&t=1
remote:
To https://bitbucket.org/perrystephensonuts/poetry.git
 * [new branch]      doing-some-work -> doing-some-work
Branch 'doing-some-work' set up to track remote branch 'doing-some-work' from 'origin'.git push -u origin <branchname> the first time you are pushing a new branch to the remote repository. If you make more commits and want to push them later on, you can just type git push and it will push all of the changes to the branch you’re currently on.
This has now established the doing-some-work branch on Bitbucket, as well as pushing the new commit to Bitbucket. If we click on the master branch button you can see that the new branch is now visible on Bitbucket:

If you select that branch on Bitbucket, you’ll see that the file list updates to show the new file we just made, and if you click on my_poem.txt you’ll see the update that we just made.
4.1.7 Merging the easy way using Bitbucket
Now that the changes are available on Bitbucket, we’ve had a meeting and decided that they’re good enough to merge to the master branch. Instead of doing the merge using the CLI like we did before, you can do it directly in Bitbucket.
- Click the Branches button in the sidebar
- Click the meatball menu (
...) next to the doing-some-work branch - Click Merge
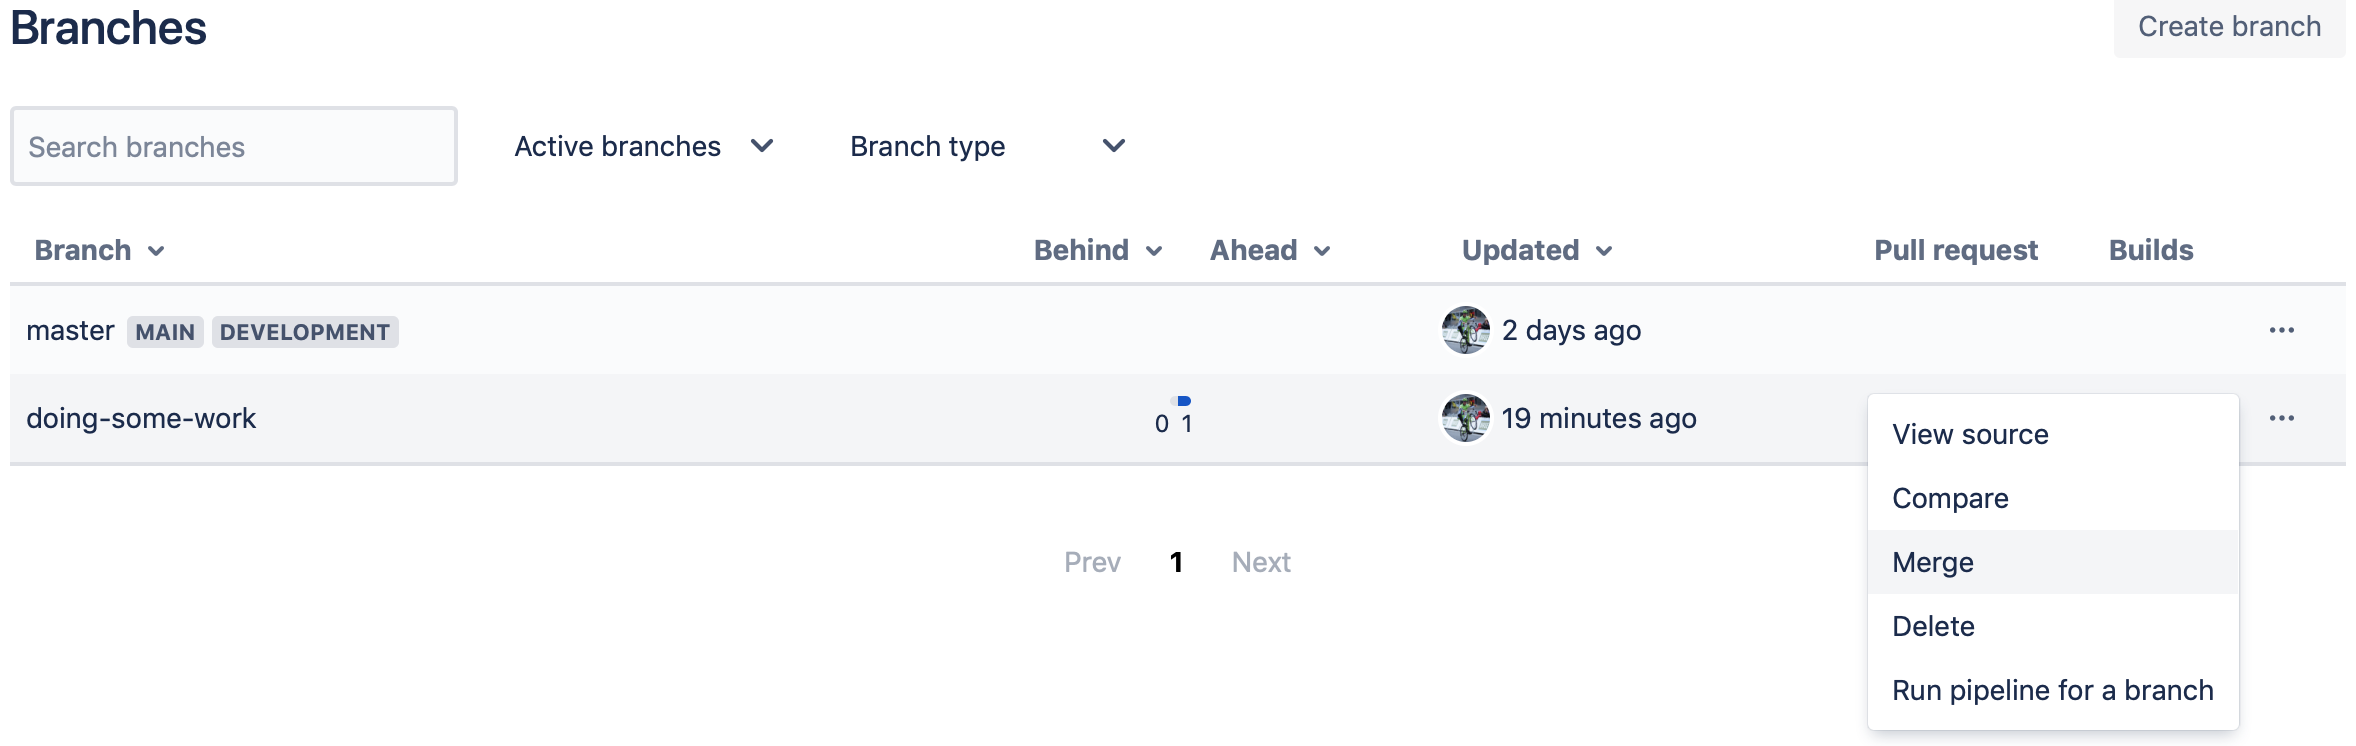
- Write a commit message (or accept the default message) and click Merge
That’s it! If you’d like you can change the filter to “All Branches” to find the doing-some-work branch and then delete it, but we won’t bother for this demo. The most important thing to note is that the merge is complete and the master branch now has the latest changes.
Now that we’ve merged the changes, don’t forget to go back to your local Git and return to the master branch:
$ git checkout master
Switched to branch 'master'
Your branch is up to date with 'origin/master'.
We’ll also want to pull the changes we made when we merged the branch on Bitbucket - we can do this with the git pull command:
$ git pull
remote: Counting objects: 1, done.
remote: Total 1 (delta 0), reused 0 (delta 0)
Unpacking objects: 100% (1/1), done.
From https://bitbucket.org/perrystephensonuts/poetry
   4dd4335..1fc6255  master     -> origin/master
Updating 4dd4335..1fc6255
Fast-forward
 my_poem.txt  | 2 +-
 new_file.txt | 1 +
 2 files changed, 2 insertions(+), 1 deletion(-)
create mode 100644 new_file.txt4.2 Working in Larger Teams
Perhaps your project team is starting to grow, and you’ve realised that letting people merge their changes into master without any checks and balances is a bit risky. Or perhaps you’ve just joined a new team that already has a strong programming culture and you’we wondering what all these strange terms mean. Either way, it’s time to introduce the Pull Request!
Essentially, a Pull Request is a conversation about changes you would like to make. As a contributor, the workflow looks something like this:
- Checkout a new branch
- Commit some new changes
- Push the changes to the remote repository
- Create a Pull Request when you’re ready to merge.
Let’s take a look in a bit more detail. For this example I’ve already created a new branch (adding-commas), made a commit (I added commas to the poem), and pushed the changes up to Bitbucket.
- Click the Pull requests button in the sidebar
- Click create a pull request
- You will see something like the page below:
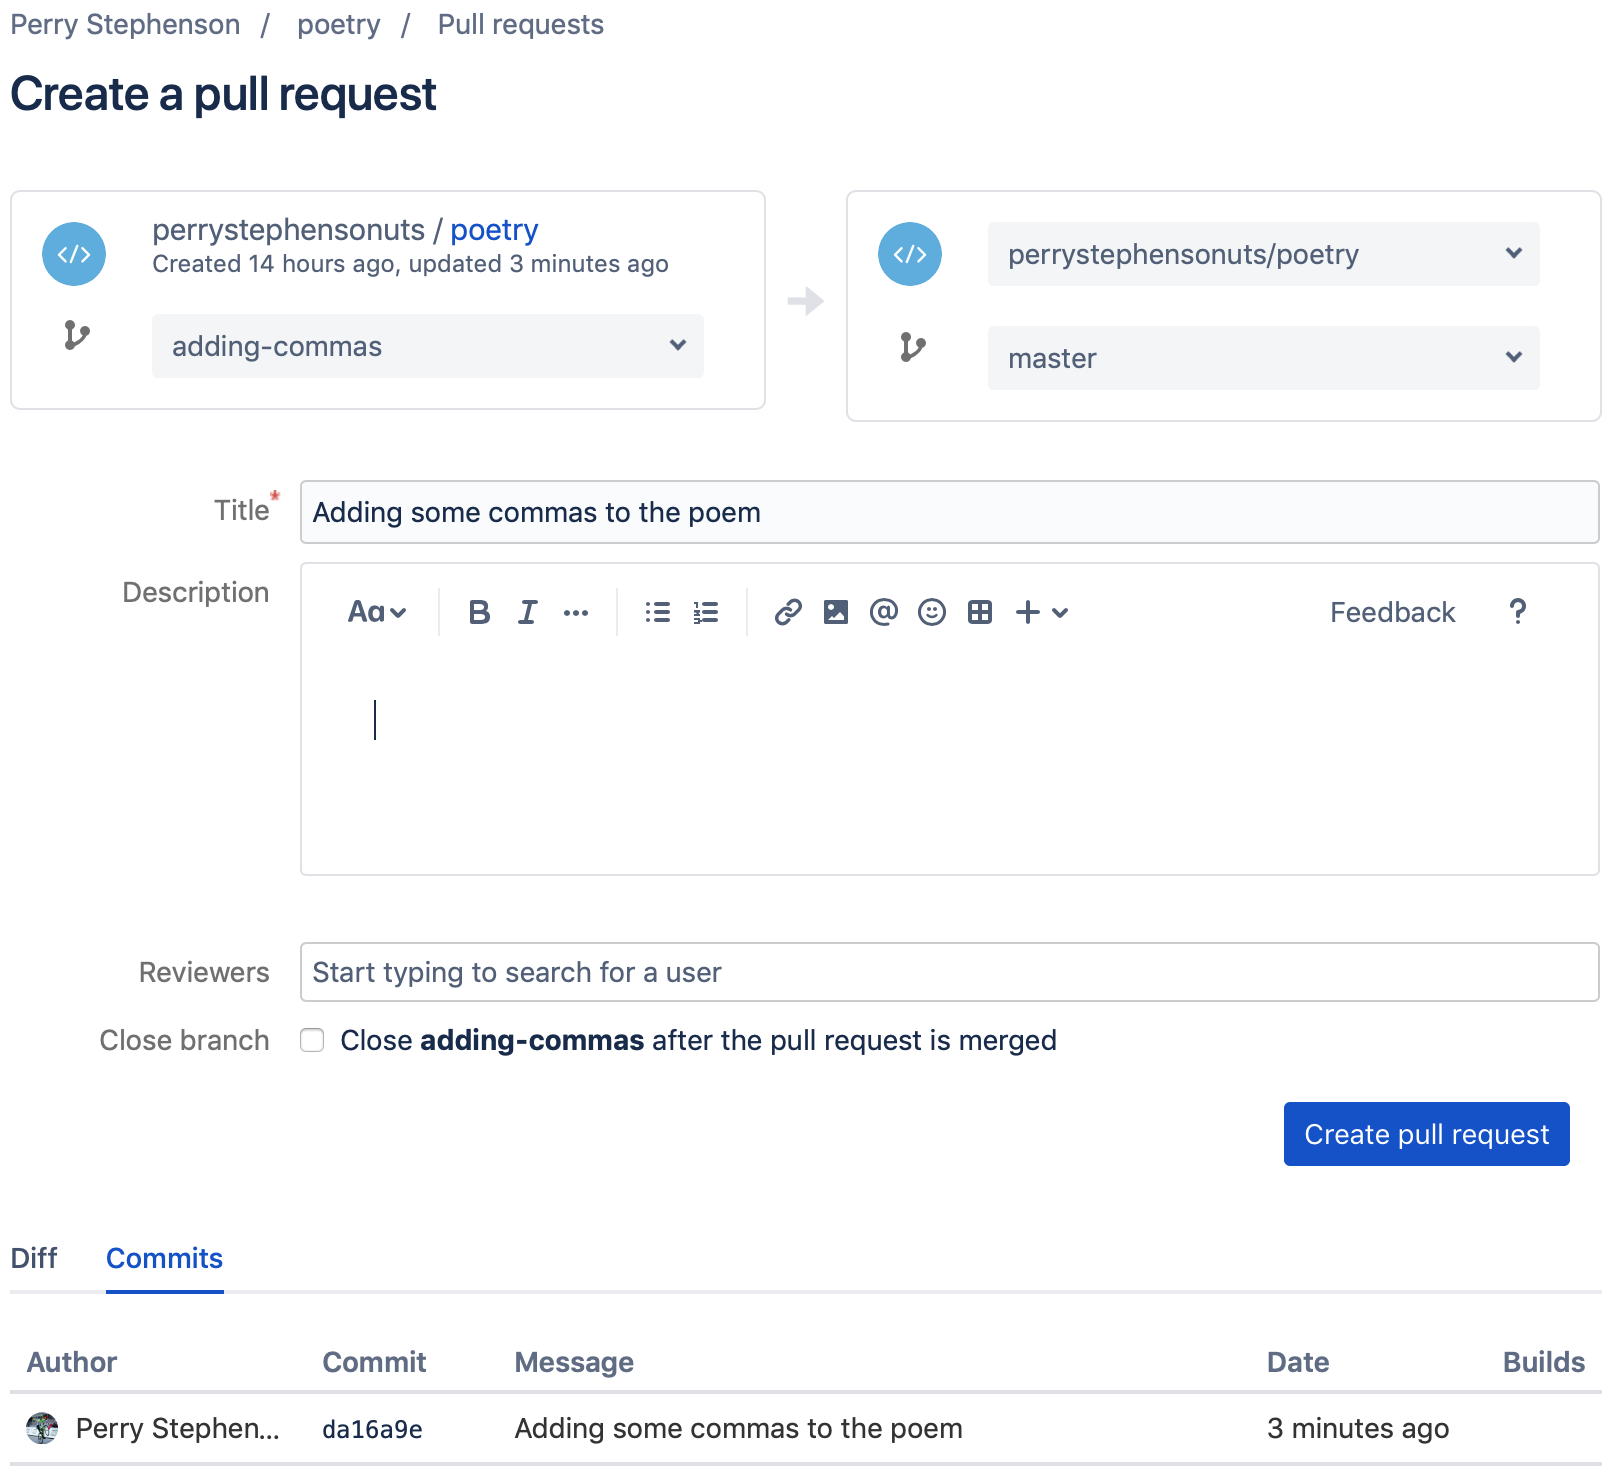
Bitbucket has been a little clever here to save us some time by correctly guessing that we want to merge adding-commas into master, but if it guessed wrong then you could easily use the drop-down boxes to select a different branch. It’s also pre-filled the title of the pull request for us, because there was only one commit it’s just taken the commit message. Again we can override this with a descriptive title that makes it clear what we’re proposing to change. You can also add some notes in the description field if you like, although this change is pretty minor so it’s not necessary.
You should always check the close
When you’re ready, click Create pull request and you will see the following screen:
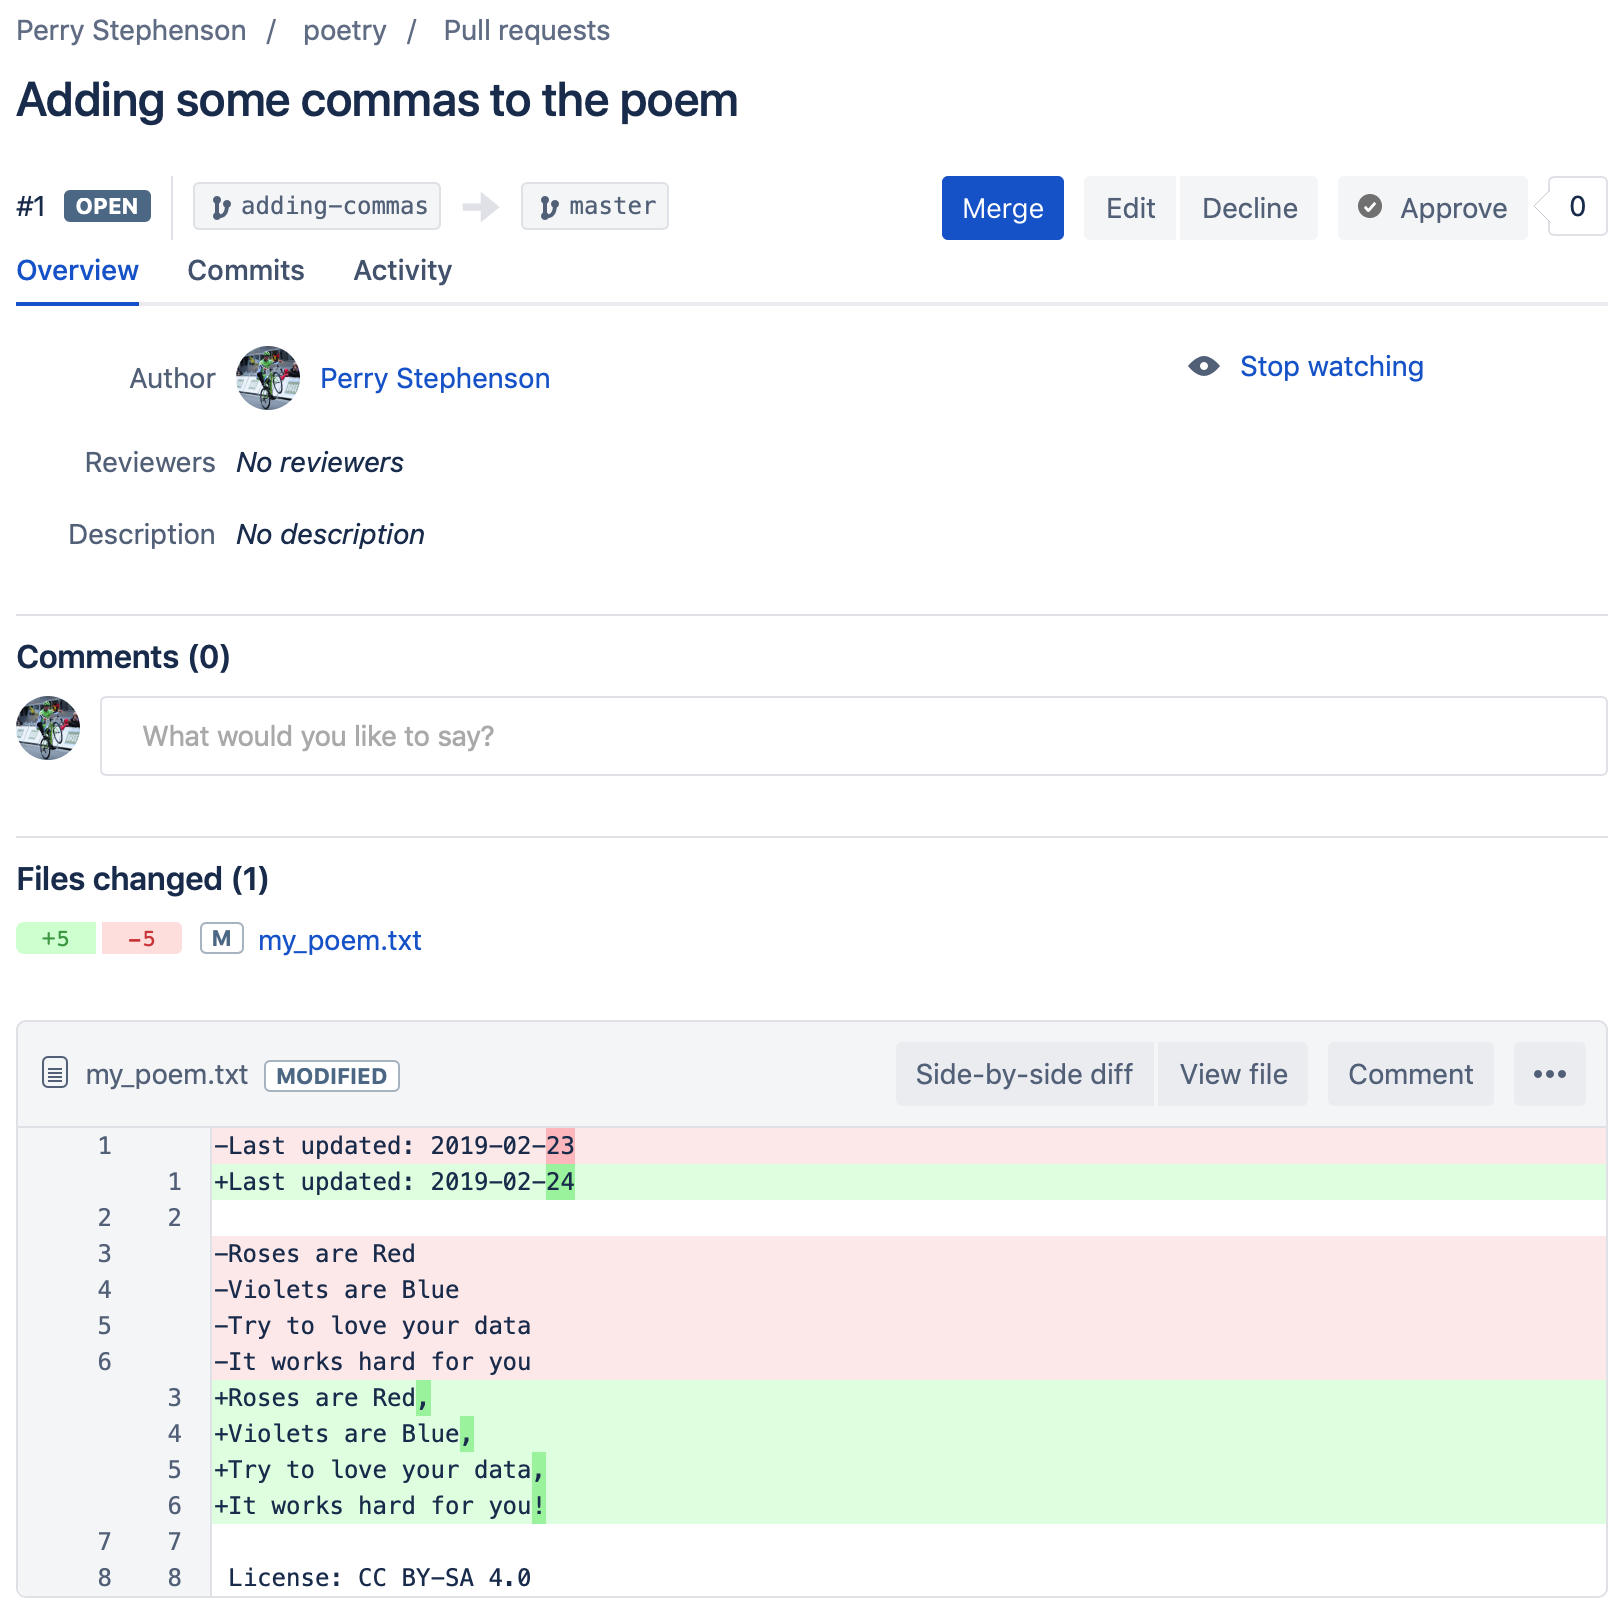
This is a pretty handy summary of the changes we’re proposing, which makes it really easy for a reviewer to come along and check that it’s not going to break things if we merge these changes to the master branch.
Let’s say that in this case our teammate “Not Perry” wants to make some changes - he could leave a comment on the Pull Request.

Fair enough I guess - I guess my high impact poetry rebellion will have to wait for another day. To make the change I don’t need to make a new branch or even another pull request, I just have to make another commit to the same branch.
To make the change:
- Edit the file on my computer, making the change required
- Commit the changes
- Push the commits to Bitbucket
Once the commit has been pushed back to Bitbucket, it gets added straight to the pull request. If you check the Activity tab on the Pull Request you can see exactly what has happened:
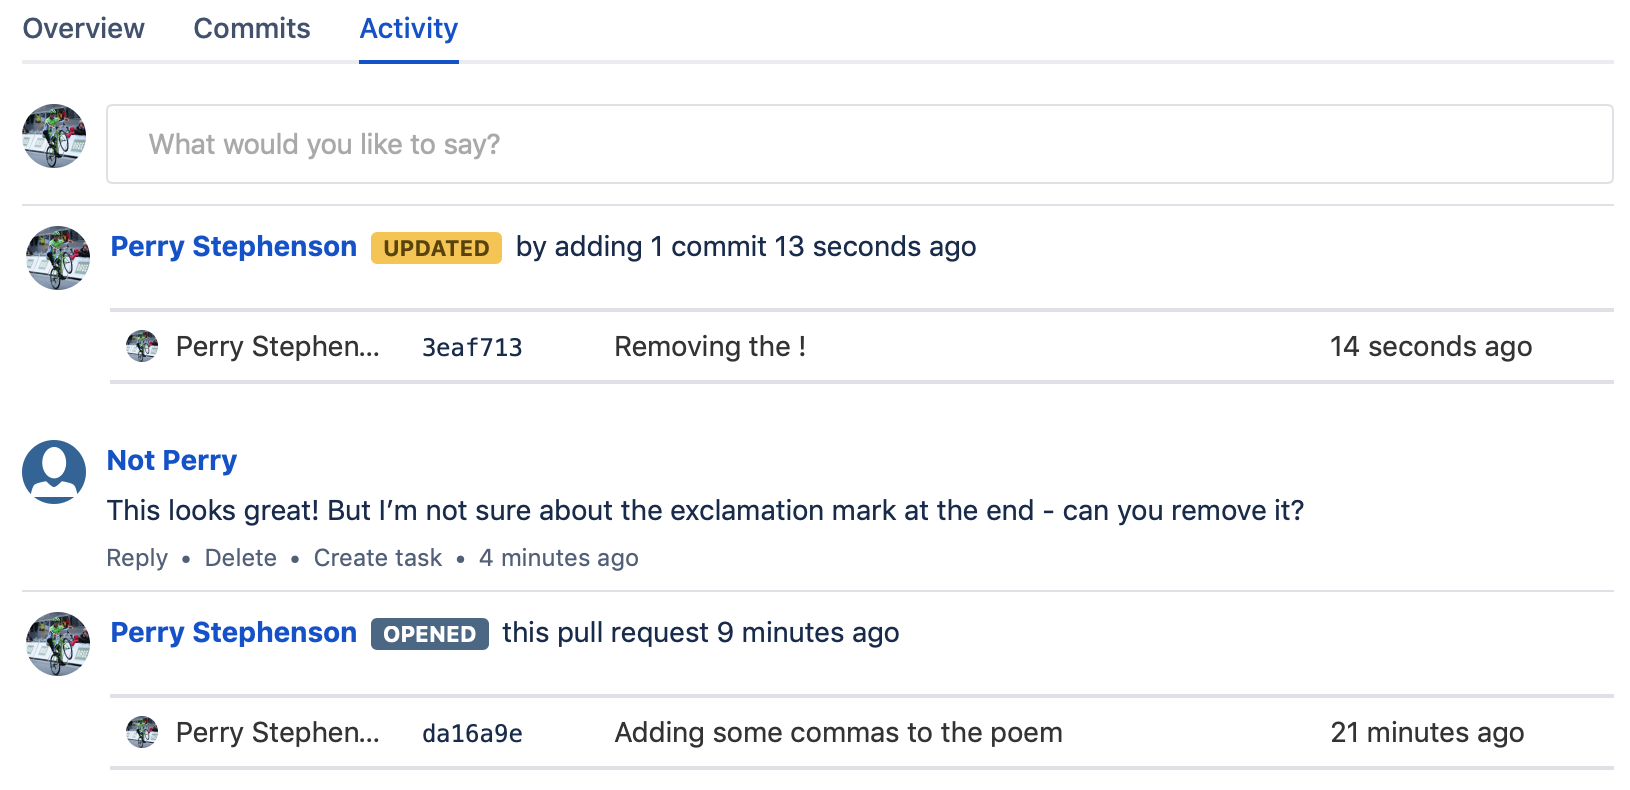
Our teammate is now happy with the changes, so they hit Approve to mark the Pull Request as ready to merge.

The approval is now shown in the Reviewers section, the combined changes from the two commits are summarised at the bottom and now we’re ready to click Merge. When you click Merge you’ll get one more chance to review the commit message that will be used for the merge commit, then you can click Merge which will:
- merge the changes onto the master branch
- close the Pull Request (it will be marked as MERGED)
- delete the adding-commas branch (because we checked the box to do so)
We can confirm that these changes have been applied by going back to the Commits tab on the sidebar:
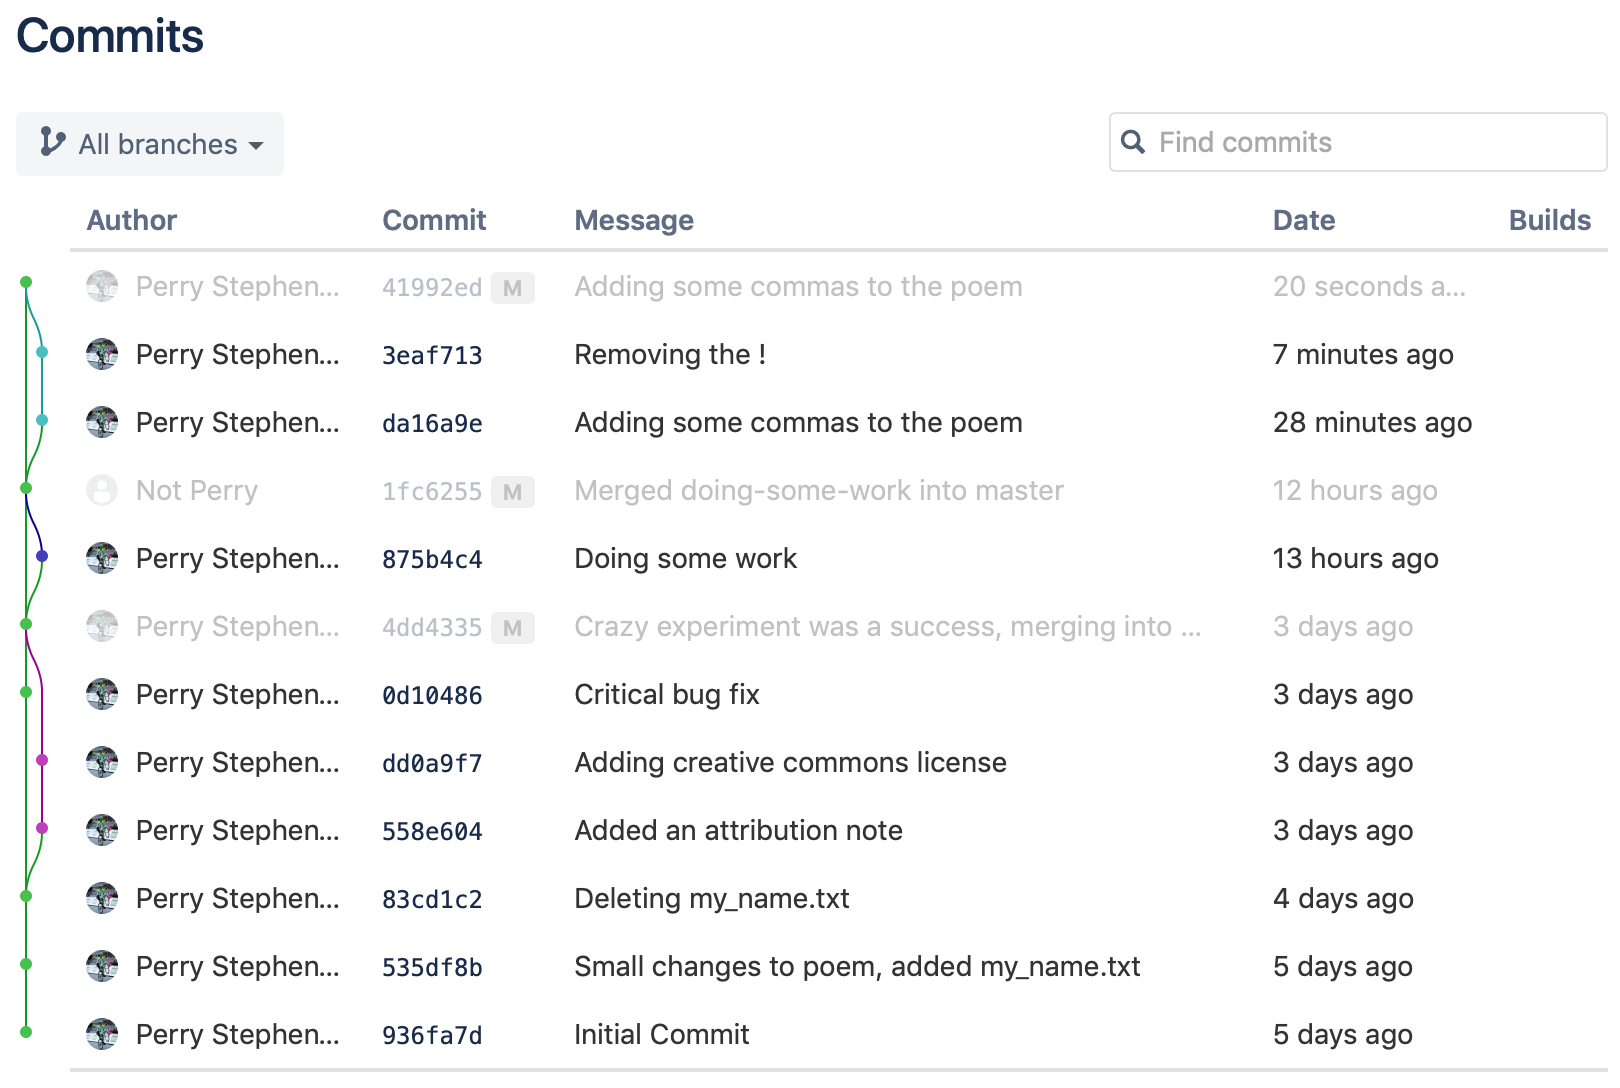
The only thing now is for everyone to git pull from their local working repositories to get the latest changes to the master branch.
We’ve basically finished the chapter now, so let’s review how we went with the Git features we wanted to cover:
- Easily undo changes to your files. (DONE)
- Undo changes you made in the past, and then re-apply all the changes you have made since then. (NOT COVERED - SEE BELOW)
- See a list of all of the changes you have made over time (DONE)
- See how your document now is different to the same document at a specific point in the past (DONE)
- Safely make major changes to your files without having to save them with funny file names. (DONE)
- Make many big changes at the same time, but not all in the same version of the file (DONE)
- Let your team make changes to your files, but without all the funny file names (DONE)
- Easy way to see the changes your boss made to your file. (DONE)
- Multiple editors working on the same document at the same time. (DONE)
- Multiple offline editors working at the same time. (DONE)
- Manual override for merging when two people have edited the same section of the document. (NOT COVERED - SEE BELOW)
- Flexible ways to review quality before applying changes. (DONE)
- As the document owner, I want to have the final say on all changes (DONE)
- During the early stages of document creation I don’t want to worry about the process. (DONE)
- Standardised naming conventions to identify versions of documents. (DONE)
- Globally recognised naming conventions. (DONE)
Further Reading
We’ve covered a lot of Git here, but there are all sorts of cases we haven’t covered:
- Complex undo operations, where you want to undo a change in the past but don’t want to lose the changes you have made since then (see resetting, checking out and reverting)
- Dealing with merges where Git can’t automatically work out how to combine the changes (see merge conflicts)
- Using permissions to “lock down” the master branch and prevent merging an approved Pull Request (see using branch permissions)
- Opening Pull Requests in Open Source Software projects (hint: you need to fork the repository to do this - see making a pull request)